

Everyone has to start somewhere, what better way to learn and love sewing than to learn these 4 basic hand stitches that every sewing hobbyist or enthusiast must learn.
First things first - there are two main ways to thread your hand sewing needle and both are good for different techniques:
Single thread: thread your needle but knot only one
end so that the other is free to come unthreaded - this is especially
useful for embroidery techniques where you might need to quickly and
easily unpick a few stitches.
Double thread: thread your needle and knot both ends
together - the doubled up thread will make for a more secure stitch,
but is impossible to unpick without cutting the thread and starting
over!

Running Stitch - what's it good for?
Good for gathering or rushing fabric to make gathered skirts,
basting seams and stay stitching a curved edge to prevent it from
stretching. A running stitch looks exactly the same on both sides of the
fabric.
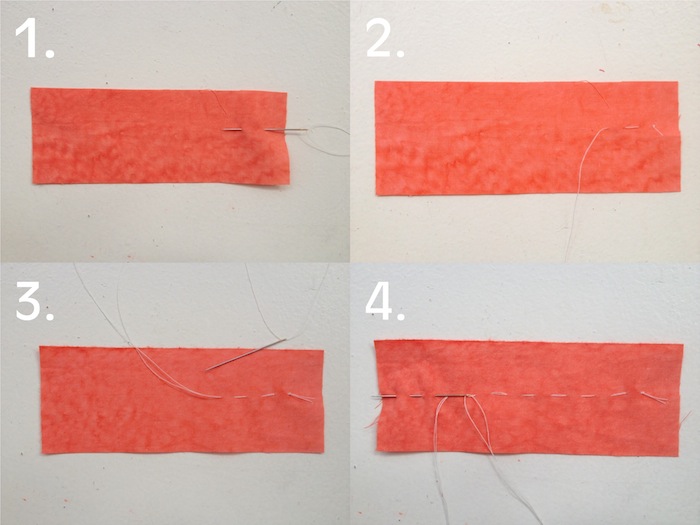
- Working from right to left (or left to right for lefties), insert your needle into the fabric and bring it back out again (fig.1)
- Now weave your needle in and out of the fabric, keeping the stitches as even and straight as possible (figs.2,3&4)
Back Stitch - what's it good for?
Mending clothes by hand - the back stitch creates a strong seam and
can reach awkward, fiddly places that a sewing machine can't. From the
right side, the back stitch looks like a straight machine stitch, but
the stitches overlap on the wrong side.
- Working from right to left, insert your needle into the fabric and come back out again, pulling the thread through (fig.1)
- Re-insert your needle half a centimeter or so to the right of where your needle just came out, and come back out half a centimeter to the left of your first stitch (fig.2)
- Continue like this, inserting your needle at the end of your last stitch to the right, and coming out one stitch ahead to your left (figs.3&4)


Blind Slipstitch - what's it good for?
This is our most favorite. A pretty much completely invisible stitch
that is perfect for pretty much anything - from basic hemming to
finishing the inside of a waistband, à la Charlotte Skirt, finishing raw edges of a bodice lining as in the Elisalex Dress and finishing the sleeveless armhole of the Victoria Blazer.
- Press your fabric and pin the fold into place ready to be blind stitched
- Insert your needle through the folded edge (fig.1) and pull the thread through
- Pick up a couple of threads from the fabric directly underneath the point where your needle just came out (fig.2) and pull the thread though (fig.3)
- Reinsert the needle into the pressed edge of the fabric directly above the point at which your needle just came out (fig.4). Using the pressed fold as a guide, slide the needle an centimetre or so along inside the fold and then come out again (fig.5)
- Keep repeating figs. 2 - 5 along the entire length and securely knot off your stitching at the end

Blind Catchstitch - what's it good for?
Especially good for hemming, in particular hems that require flexibility or easing in.
- Press the hem in by 1/4″, and then press in again by 1/2″, or however much or little in order to achieve your desired length
- Working from left to right, insert your needle inside the fold (fig.1)
- Make a little stitch in the fabric just below the fold (fig.2)
- Next make a stitch in the main body of the fabric, moving diagonally down to the right of your first stitch (fig.3) and pull the thread through, keeping it secure but not too tight (fig.4)
- Moving diagonally up to the right, make another little stitch in the fabric just below the fold (fig.5) followed by another little stitch from the main body of the fabric (fig.6), and so on


Finishing off your hand stitches
Just as we back stitch on a sewing machine, securing the end of a
line of stitching to prevent it from coming undone, so we have to
securely knot the thread when stitching by hand as well.
- On the wrong side of your fabric, and with your needle still threaded, insert the needle close to where the thread is coming out, catching just a tiny thread of the fabric as you go (fig.1)
- Pull the needle and thread through, stopping when you have a little loop to insert your needle through (fig.2)
- Bring the needle and thread through the loop, keeping the forming knot close to the fabric (fig.3)
- Tighten the knot and snip the thread a few millimeters from the knot (fig.4)


Comments
Post a Comment