

This is an article from theguardian.com
If your favorite jeans have seen better days, turn them into some stylish slippers. The doyenne of denim, Nancy Minsky, shows you how.

Denim slippers made from an old pair of jeans. Photograph: Nancy Minsky
I am the Jean Girl - I patch, mend and refashion denim in all kinds of special ways. Handcrafting old jeans, with style and imagination, can give your wardrobe a burst of fresh fashion without the designer expense.
The appealingly soft textures and faded colors of worn denim make it the perfect fabric to sew into "new" things. So yank those long-forgotten jeans out from the back of your closet and discover what you can create!
If you have intermediate sewing skills then you can easily stitch yourself a pair of proper denim slippers. When you're finished, slip your feet into these soft, soothing slippers and pad around your home feeling lovely and comfy. Or just put your feet up and glow with satisfaction while you gaze at your resourceful - and chic - handiwork.
Materials Needed:
- Pair of Old, Cast-off Jeans
- 25cm Wadding
- 25cm Iron-on Fusing
- Piece of Thin Cardboard (not the corrugated type), about 30x30cm
- Two Pattern Pieces
- Around 60cm Ribbon (I've used pink and white gingham)
- Blue Thread (choose a shade that matches your denim)
- Scissors
- Straight pins
- Pencil / Tailor's Chalk
- Needle and Thread / Sewing Machine
Instructions:
Step One: Prepare The Pattern
• Print out the pattern pieces and enlarge to the right size. To check the size, stand barefoot on the sole pattern. The edge of the pattern should extend about 2cm beyond your foot.
Step Two: Cut The Denim
• Cut the legs off your jeans and cut them open along the inside seam. Lay them flat on the table.
• Using the pattern, cut one sole piece and one upper piece from one of the legs. Worn denim has many color variations. Use your favorite shades of blue, especially for the top upper, which will be the most visible. Draw on the stitching lines using a pencil or tailor's chalk. Turn the paper pattern over, then cut one more of each piece from the same leg. Mark with pencil or tailor's chalk as before.
• Repeat this last step using the other jean leg. You'll now have eight pieces of denim. For a more professional look, cut the pieces so that your left and right slippers are a good color match.
Step Three: Cut The Other Pattern Pieces
• Using the paper patterns, cut two pieces of the sole and two pieces of the upper out of the wadding.
• Again, using the paper patterns, cut the same four pieces out of the iron-on fusing.
• Using just the sole pattern, cut two pieces from the cardboard. These now need to be trimmed, so they are 1.5cm smaller than the pattern all the way around.
• Now to get organized: put all your left pieces into one pile and all the right pieces into another pile.
Step Four: Sew The Upper
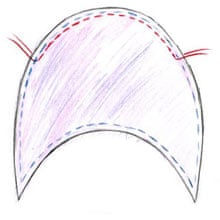
Figure A
• Start with the left upper. Place the left denim upper piece on to a flat surface, right side down. Following instructions on the fusing packet, iron it to the wrong side of this denim piece.
• Take the wadding and sandwich it between the two denim pieces - the right side of the denim pieces should face out. Pin these three pieces together.
• Temporarily sew these pieces together using long, easily-removable stitches (this is called "basting"). Remove the pins, then stitch all around the perimeter, 1.5cm from the edge, as marked in figure A.
• Sew a running stitch (red thread in figure A) on the toe, as marked on the pattern (later it will be pulled to form gathers.)
• Repeat all of this with the right upper.
Step Five: Prepare The Sole
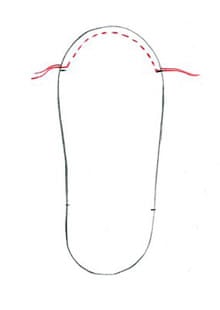
Figure B
• Start with the left sole. Place the left denim sole piece on to a flat surface, right side down. Following instructions on the fusing packet, iron it to the wrong side of this denim piece.
• Stitch a running stitch on the toes of both denim sole pieces as marked on the pattern and figure B (later they will be pulled to form gathers.)
Step Six: Sew The Upper To The Sole
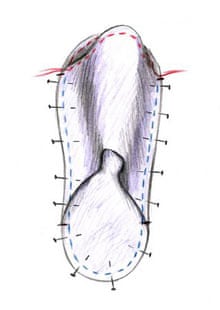
Figure C
• This step is rather cumbersome, but don't despair - it all works out and in the end you'll have a durable and comfortable slipper.
• Start with the left slipper. Lay the wadding on the table and align the denim sole on top (the upper one), right side facing up.
• Align the upper on top, right side facing up, as noted with blue thread in figure C. Pin and baste together.
• Align the other denim sole on top, with the fusing facing up.
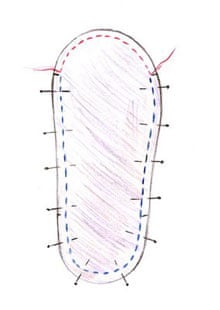
Figure D
• Pin, baste (those temporary stitches), remove pins and stitch around the 1.5cm seam allowance, as marked in figure D. Back stitch and knot thread ends.
• Remove the basting, and clip and trim the seam allowance.
• Turn the sole right-side out, wiggling it through the toe.
• Take something long (I used a chopstick, but the end of a pencil or even a pair of scissors will also work well), slip it inside, and nudge the seam into a nice smooth edge.
• Slide the cardboard inside, between the lower sole and the wadding. If it's a squeeze to slip the cardboard inside, fold it a bit. Don't worry, it will flatten out and will still be supportive.
• Repeat with the right sole.
Step Seven: Finish The Toe
• Starting with the left foot, pull the running stitches you added earlier on the sole so it curls naturally around the cardboard toe. Knot the ends of the thread so that it stays in place.
• Pull the running stitches on the upper so it matches the shape of sole.
• Tuck the seam allowance inside the toe and hand-stitch the toe closed with little neat backstitches.
• Repeat with the right foot.
Step Eight: Adorn Your Slippers
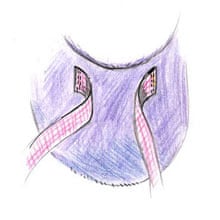
Figure E
• Cut the ribbon into four pieces of equal length.
• Pin two pieces on the left slipper front, about 6.5cm apart with a 1.5cm fold back. Hand-stitch in place along the folded edge, following figure E.
• Tie into a snug bow.
• Cut the ribbon ends at a diagonal.
• Repeat with the right slipper.
• Knot all threads securely.
• Alternatively, adorn them with feathers and beads, pretty buttons, different fabric mixes or fabric flowers. Search through your sewing basket to find the right combination that reflects your personal style.
credits to: theguardian.com

Comments
Post a Comment